| Author
|
3 Fundamental Spectrums in Mixing
|
TranceAphobic

Started Topics :
7
Posts :
29
Posted : Jan 7, 2014 16:54:10
|
Aaaaahhhh, the world of mixing- and what a world it is.
I want to talk about the 3 Fundamental Spectrums which I keep in consideration when mixing. These areas define the space of each instrument and creates a virtual room within the speakers.Keep in mind that for everything to fit/play/work together it needs to come from different locations. Almost like taking a picture of 20 people. They don’t stand in a line behind each other. Each person’s face is visible, standing in his/her own location. This in the end forms a complete image of 20 people in a group. When it comes to music the photo is just made up of sounds. You are the photographer wanting to take a picture of your track, placing each element to be visible (audible) in the limited space you are given. Each instrument will get 3 names. Main name (Sfx1, Lead 1, Bass-line), Stereo Name (12L, 5R or 35L) and Db level name (-20db, -15db or -25db). These names will keep things organized and simple. I usually leave the volume levels till later. And start with the panning, building up a virtual grid. By using the concept of layering and layering some more we achieve a well balanced and spaced out track (pun). Just like the photo, if you have 60 people that needs to fit into a limited lens space you also start to layer them in rows, each row being higher or lower than the other, until everyone is visible.
We will be looking at the following.
1.) Stereo Spectrum
2.) Volume/Db Spectrum
3.) Frequency Spectrum
The Stereo Spectrum: (L&R)
Panning, it is here where I just love to build my virtual grid. I try to form a symbol with the track, having similar sounds in the same areas. Important: "To pan effectively, all instruments have to be in mono form." Many guys pan their instruments but keep everything in stereo, which in the end gives too much space for that individual element- and ends with a cluttered mix. So before panning, I crank up the knob on the stereo separation to 100% merged (mono).
Even though everything is Mono, it will end with a beautiful stereo image when playing together. I start with the Kick-drum and Bass-line and pan them 1% L and 1% R. Many would throw both dead center, but I like to keep that area open for special sounds/vocals.
With 1%, both are still very much in the center, but just that little bit out of each other’s way. The space you have in the Stereo spectrum is 0% - 100% L&R, so usually my grid spacing is on every 10%. Where you place the rest of the instruments is up to you, get creative. Here is an example of my latest Trance track’s locations.
I had a single snare and Hihat, that took 10% L&R. 2x Loops @ 20% L&R. 4x Percussion hits @ 30&40% L&R (two on each). Reverse FX @ 50% and 0% center, depending if there was an opening at the moment. Reverb Kicks @ 60% L&R and 0% center. Lead 1 @ 70% L&R, usually duplicate the lead, pan one 70%L and the other 70%R and make minor changes to one. This keeps the balance in the stereo image and also gives variety and fullness. Lead 2 @ 80%L&R, also duplicate. And end with Lead 3&4 or other SFX @ 90-100 L&R. You can play around in the 70-100% L&R range. Look for the open gaps and pop in another FX if necessary.
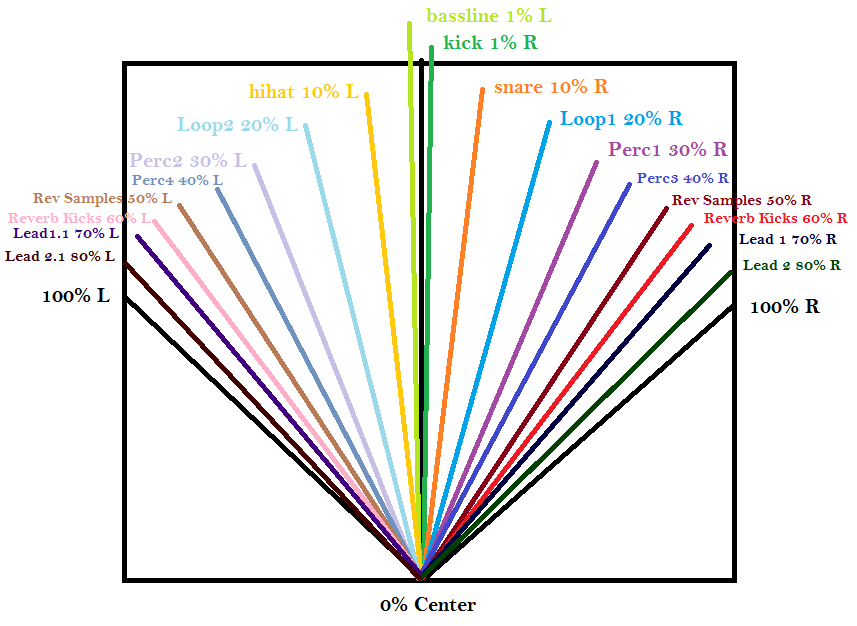
This is now where the symbol is formed. As seen in image 1 you will have your Kick, Bass, Hihats, Snares, Loops and Percussion almost grouped together in the center of the grid. The Hits and Reverse samples creating a space between, and the Leads and SFX running at the bottom with a nice wide sound that fills the rest of the spectrum. It opens up like a flower. Note that each sound needs a partner opposite of itself to keep a well balanced stereo image.
That is it for the Stereo spectrum, let’s move on.
The DB Spectrum:
Your dynamic range is the distance between the loudest and the softest instrument in your track. Let’s say you have a Kick-drum @ -10db and a Hihat @ -30db, then you’re dynamic range would be from -10db to -30db. I usually don’t define the range from the start. I start off composing – concentrating on the creativity of the sound, filling up the Frequency spectrum so that the listener has limited elements to concentrate on, but still giving the track a full sound.
Here we create the second area in our virtual grid. Like before, we achieve this by layering the sounds into steps and by giving each sound its own specific db level.
If you have two hihats- one hihat is on -30db and the other is on -28db, then you present two new areas of the virtual grid. For me it’s very important that every sound has its own db level, even if it's only 1db difference, and no other sound shares that db space, except when it plays on different times in the track.
You may think what is the difference between 1 or 2db’s. Well not much- but can really change your overall sound. Usually start off with the Kick-drum being the loudest, Bass-line the same volume or 1-2db’s lower (Low Range), then Leads, SFX, Hits, Rev samples, snares (Mid Range), and finally the Hihats, Loops and background sounds being the lowest in db level ( High range). This is where the dynamic range starts to form. Different genres have different dynamic ranges. So it would be nonconstructive to specify exact db levels. With Trance the kick and bass-line is very close in level, but with acoustic rock I have found my bass-line much lower than the kick while still sounding good together. Check out image 2 below.
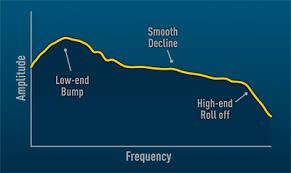
By looking at this image we see the lower frequencies being the loudest and sloping down to the High frequencies. By having a strait yet tilted line your levels will be coming together nicely and will end up sounding well balanced.
I use LIMITERS to keep every sound at the roof of its own level. So if you give a “lead sound” a roof of -15db, it never exceeds that point. Even if the frequencies/volume changes in level due to modulation. Just make sure every sound stays against its own roof. When you EQ a sound it may lose/gain some db’s , so keep an eye on the limiters when making changes to keep every sound at its defined spot. Also don’t make the sound go through the roof of the limiter. Meaning, don’t let the sound be limited @ -15db and you crank the volume to -5db. Over limiting is like over compression which is undesirable. Let it gently touch the roof so the limiter shoots back only about 1-2db’s.
In the end you will have created db steps as shown in image 3.
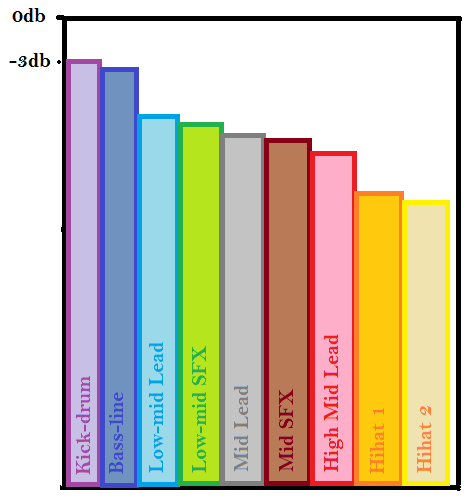
Each sound standing a step higher or lower in DB’s, than the previous one. Throughout the track – with every sound @ its own db level, each sound presents another space in your virtual grid. With db levels or reverb (front to back) and panning (left to right) we have created a virtual space with 2 dimensions. Play around with the levels and find the spot where a specific sound wants to be, while not interfering too much with the fundamental instruments in your track.
Frequency Spectrum:
This spectrum is fairly strait forward. Using equalizers you carve out locations for each element. Even though each instrument has different panning and db levels it can still interfere with one another almost like giving an overdose of a specific frequency. (i.e. two instruments in the same range, playing together)
Some rough EQ examples.
With my kick-drum I usually cut a @ 2Khz or 3Khz +-4db, with a small wide Q. It can give a softer sound to the kick. Bass-line a more narrow Q @ about 250hz +-5db. With your monitors you will find the location with ease. Also gives a softer sound to it and takes away some mud. Mid instruments – Highpass @ 200-250hz to keep out of the way of the bass instruments. Loops and hihats – Highpass @ 2Khz (play around to keep the thickness without interfering with the mids.) Other EQ narrow cuts will depend on the instruments fundamentals. So without good monitors it will be difficult to find those frequencies.
Keeping the ranges ( low,mid,high ) out of each other’s way is really the main point here, then giving small boosts on fundamental frequencies to make each instrument stand out and having its own energy shine through.
It’s all about presenting music to the listener. By giving each element its own space in stereo, db level and frequency you are actually presenting different areas of a virtual room that you created. You will also be able to hear how every sound is individually clear and any previous clutter has vanished.
That’s it. Hope this cleared up a few things for all the guys still struggling with mixing.
Good luck

|

|
|
Nomad Moon
IsraTrance Full Member

Started Topics :
134
Posts :
1516
Posted : Jan 7, 2014 18:42
|
very cool post, thank u, have a question regarding reverbs as send efects, do u use them and how u setup the diferent ones, no hurry here just curiosity
ty
 Tudo que é melhor e mais superior em mim saúda tudo que é melhor e mais alto em si Tudo que é melhor e mais superior em mim saúda tudo que é melhor e mais alto em si |
|
|
|
martinleblanc

Started Topics :
2
Posts :
2
Posted : Jan 7, 2014 22:08
|
Great post, Nomad Moon!
Do you recommendation for blogs or books to read on this subject? |
|
|
|
UYOYU
Started Topics :
0
Posts :
10
Posted : Jan 8, 2014 01:29
|
|
PRO-Gram
IsraTrance Junior Member

Started Topics :
21
Posts :
110
Posted : Jan 8, 2014 12:23
|
This is an excellent post, thank you for your time, out of curiosity do any other experienced producers take a similiar approach?
Also question, you say you use a specific limiter on each track surely this really eats into your CPU? |
|
|
|
Nomad Moon
IsraTrance Full Member
Started Topics :
134
Posts :
1516
Posted : Jan 8, 2014 12:40
|
Quote:
|
On 2014-01-07 22:08, martinleblanc wrote:
Great post, Nomad Moon!
Do you recommendation for blogs or books to read on this subject?
|
|
ehehe, wasn't my post, prop's to TranceAphobic
Tudo que é melhor e mais superior em mim saúda tudo que é melhor e mais alto em si |
|
|
|
Conny
IsraTrance Senior Member

Started Topics :
224
Posts :
149
Posted : Jan 9, 2014 07:57
|
Amazing post. I am kind of a new when it comes to mixing and have allways thought that all sounds in a mix should have the same volume. But this spectrumgraph showe that the lowfrequency in should have higher volume than the highfrequency instrument, am i right?
|
|
|
|
Babaluma
IsraTrance Junior Member

Started Topics :
18
Posts :
729
Posted : Jan 9, 2014 10:45
|
|
TranceAphobic
Started Topics :
7
Posts :
29
Posted : Jan 9, 2014 11:42
|
Thanks for all the replies guys. Glad I could share some of my knowledge.
Nomad Moon –
Reverb is a very important part in the quality of the sound. It makes everything blend together, give fullness/richness. A mix that is too dry can become lifeless and boring. Many guys think that dry is associated with a tight mix, because nothing bleeds into the other and every sound is short and tight. In some situations it would be true, but real tightness is achieved with compression. Reverb creates small internal links between all the sounds and needs to be respected as an effect. Do some research and learn about the different functions of reverb. ( Early reflections, Diffusion, etc ) Don’t just add reverb because everyone tells you to. Know why you are using it and understand what effect it gives to your individual sounds. A/B’ing your reverb effect will help to realize what you are adding in the end. I add reverb to individual samples if they sound a bit too dry, just to make it shimmer a bit. This is first level reverb which is added on each individual channel. Note: Not all channels/sounds require this; some sounds should be more dry than others, to give variety and to make it interesting. In the first level you would use reverb to its full potential. Second level reverb would be when you group channels together into one “Send”. What sounds define the drumset of a trance track? For me- the Kick-drum, snare, hihats, cymbols, rides and percussion. So I would tunnel these to “Send one”. My leads and other mid fx ( depending on the relationship in frequency ) to “Send 2” etc, etc. In this Second level reverb I usually keep it subtle, not adding too much, because the real effect of reverb was added in level 1. Also you don’t want to add too much to your kick-drum/bass-line or too much to the overall mix. Over-Blending can sound a bit piled up. Add in moderation. By grouping similar channels in Sends and giving each its own distinct bit of reverb, can again give variety and definition to your track. Third level reverb would be added in the mastering phase on the overall mix. Just to provide that final touch of quality.
PRO-Gram –
Every producer is unique. Many would use these techniques, but in their own way. Someone once told me… It doesn’t matter how you get there – if you reach your goal it’s all good. With this post I concentrated more on Psy-Trance production. Different genres have different techniques, compression, eq, mixing, etc.
i.e. A psy-trance Kick-drum wouldn’t be EQ’d the same as a Rock/DnB/Dubstep/Metal Kick-drum. Sometimes even if you have two kick-drum samples based on the same genre, both would have their own EQ curves, because the frequencies within the sound will always be different.
A psy-trance track tends to have more sounds playing together. That is why I take everything down to 100% Mono. Otherwise they would become like a crowd of people going through a narrow doorway. With a symphony it’s the same, but let’s say you only have 7 Violins playing together. Two keeps the rhythm (panned to 50% L&R), two for background build-ups (panned 100% L&R) and the other 3 playing the Main melody (panned 25% L&R and 0% center). I would then open up the stereo a bit, because there is now more space to be occupied. It all depends on the sound you want to achieve. Try different techniques until you find the one that works for you.
On the limiters, I do get a fair amount of load yes. That is why mixing comes afterwards. Reverb, delays, chores, automation, stutter, EQ spacing and flanger effects is applied in the production phase, then mixing in the Post. Also take into consideration that different limiters has different loads. So find a few nice limiters, to have when the strain becomes too much.
Conny
Yes, as seen in image 2. Just don’t go overboard; over wise the loudest sounds would overwhelm the softer sounds and your overall balance will be off. Keep the line strait yet tilted. Use commercial tracks as reference points, just to see the correct angle, because if it tilts too much, your mix will be unbalanced (low frequencies drowning the highs). With reference tracks you will see the line is still fairly strait, with a small decline towards the highs. With Izotope Ozone 5 you can take snapshots of this, to keep as a reminder when mixing or even producing your track, but in the production phase Ozone will only be used as an analyzer.
Babaluma
I keep that in mind everyday, haha, will upload something in a few days and let you know.
Cheers guys and enjoy
|
|
|
|
Soma_Happiens

Started Topics :
9
Posts :
120
Posted : Jan 9, 2014 12:21
|
great insights, esp with 100% mono and panning. It somehow never occured to me why sometimes i wont get desired effect when panning.
On the other hand your example with orchestral panning does not make much sense - it is possible, but pretty much no orchestra, or ensemble sits like your example  but it's cool as hypothetical example anyways but it's cool as hypothetical example anyways
EDIT:
to think about orchestra, i was not quite right too. one way (quite new approach) to position orchestra is like in EDM having Dbasses, cellos and violas in the middle (both slightly panned from the center because of space restrictions), first and second violins ~75% L and R. so if Brass and woodwind are considered as leads they are positioned ~ -30/+30 pan (depending on how much players you have)
In A Society That Has Abolished All Adventure The Only Adventure That Remains Is To Abolish Society
_________________________________
http://soundcloud.com/soma_happiens
http://www.facebook.com/SomaHappiens |
|
|
|
TranceAphobic
Started Topics :
7
Posts :
29
Posted : Jan 9, 2014 13:26
|
I am sure you're right Soma. Haven't worked on any orchestral mixes before, just used 7x violins as an example. You can actually use that example for a killer trance layered lead.
:-D
|
|
|
|
Soma_Happiens
Started Topics :
9
Posts :
120
Posted : Jan 9, 2014 13:56
|
i also haven't, just involved in panning their chairs and notestands  but actually looking forward to it since my venue is gearing up slowly so mabe some day i get to mix an orchestra (a gazillion mic's short still ) but actually looking forward to it since my venue is gearing up slowly so mabe some day i get to mix an orchestra (a gazillion mic's short still )
In A Society That Has Abolished All Adventure The Only Adventure That Remains Is To Abolish Society
_________________________________
http://soundcloud.com/soma_happiens
http://www.facebook.com/SomaHappiens |
|
|
|
Nomad Moon
IsraTrance Full Member
Started Topics :
134
Posts :
1516
Posted : Jan 9, 2014 17:19
|
|
played yesterday with those panning settings, must say i got very good results, still need to figure out the levels, but liked it very much
Tudo que é melhor e mais superior em mim saúda tudo que é melhor e mais alto em si |
|
|
|
Rework
IsraTrance Junior Member
Started Topics :
27
Posts :
45
Posted : Jan 10, 2014 08:46
|
|
TranceAphobic
Started Topics :
7
Posts :
29
Posted : Jan 10, 2014 10:39
|
Soma
I understand the concept of panning the chairs and note stands, working on my rock production lately, where I pan the drum elements to the angles they are sitting at. Say snare-drum 30%L and hihat 20%L. Like you were sitting infront of a drumset. Kick drum and bass again @ 1%L&R, cymbols 40,60,80,100%R (do experiment) cause there is one cymbol above the hihat and snare too and Toms @ 50,70,90%R. Maybe pop in one @ 55,75%R also. Eventhough the drums will not be 100% balanced in the stereo spectrum, it really brings out great results when you add the rhythm/lead guitar and vocals, which keeps the main balance.
Nomad:
I am glad to hear its working out for you, keep at it and maybe you hit greatness in the near future. ;-)
Rework:
Thanks man, I feel sharing ideas is the way of the future. To help one another end the struggle. O, and you too.
|
|
|
|
|